How to Change the Torch Liner in Your MIG Welder
May 23, 2022
The liner in your MIG torch is just one component that makes up a smooth wire feeding experience. If there are any issues with it, you’re going to have problems when you weld.
That’s why changing your liner as needed is essential. Letting your wire drag because your liner has kinked inside the torch is going to give you an erratic feed, which you don’t want.
Changing your liner is relatively easy, so when you do need to change it, here’s our step-by-step guide on how.
What is a MIG torch liner?
The liner inside your torch guides the filler wire through your torch lead, and it ensures that the wire makes it out of the torch tip. Like with most things welding, your liner needs to match the type and size of your filler material.
If you’re using mild or stainless steel, you can use a standard MIG liner. If you’re using aluminium, you’ll need a Teflon liner.
Torch liners are also colour coded, so you can tell by sight whether it’s the one you’ll need for filler wire size.
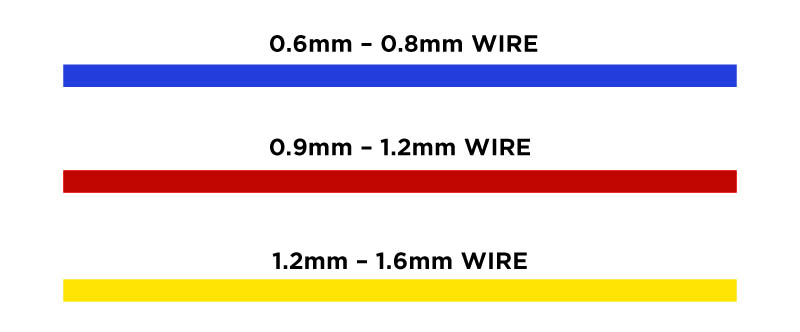
These colours apply to both steel and aluminium liners. The main difference is the neck spring on the Teflon liners.
You may need to change your liner before you feed your wire through, as they’ll only fit specific sizes. You’ll also need to change your liner if it is clogged, damaged or kinked. Here’s how.
How to change a MIG torch liner
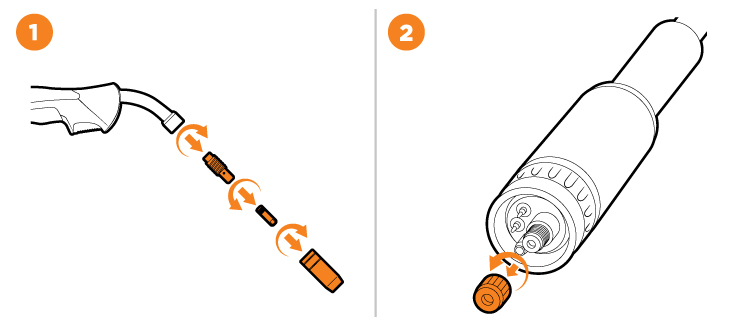
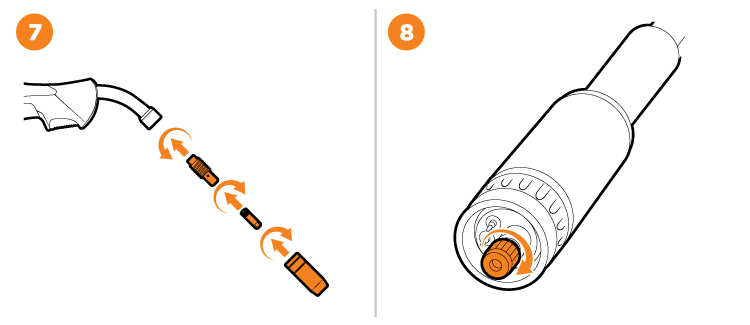
1. Remove the nozzle, contact tip, gas diffuser and tip holder from the front end of the torch.
2. Remove the liner retaining nut from the end of the torch.
3. Carefully pull out and completely remove the existing liner. Make sure the MIG torch is laid out completely straight when you do this.
4. Carefully feed in the new liner down the torch lead to the end of the torch neck.
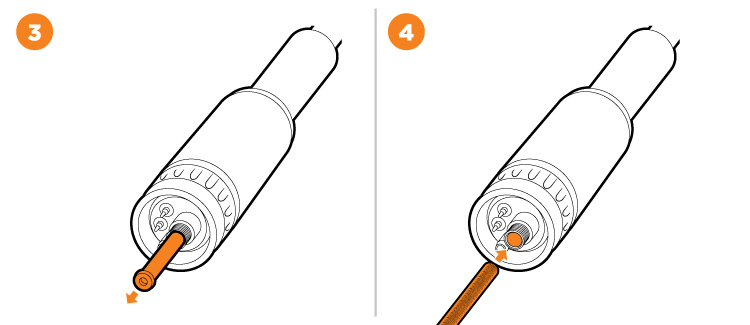
5. Fit the liner retaining nut and screw it halfway down. Don’t tighten it yet.
6. Snip the excess liner off to just below flush with the torch neck. The liner should line up with the bottom of where the tip holder screws in.
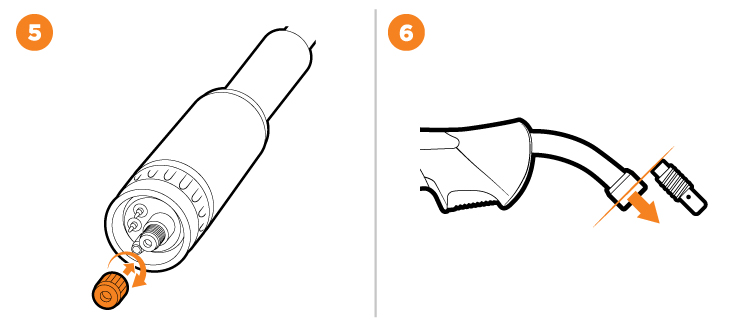
7. Replace the front-end parts of the torch. If you can’t screw the tip holder back into place, the liner is too long and needs to be trimmed. However, don’t cut it too short, as leaving a gap between the liner and tip holder inside the torch will also cause issues.
8. Fully screw down the liner retaining nut and nip it up tight. This compresses the liner inside the torch cable assembly, preventing it from moving during use.
When you’re changing your liner, it’s best to keep the torch entirely straight and go slowly, as you don’t want to kink the liner itself.
Quick tip: Lay your new liner next to your old liner and use the older liner as a measurement guide, cutting the new one to the same length. That way, you can be sure that the liner will fit in the torch perfectly.
There are separate liners for steel wires and aluminium wires. If you’re going to use a standard MIG torch for an aluminium wire, you’ll need an aluminium specific liner (in the correct size).
How to change a Teflon liner
Replacing a Teflon liner (when working with aluminium) is mostly the same as replacing a steel liner, except there are a few extra steps.
Once the old liner has been pulled out, you’ll need to attach a neck spring to the top of the new liner before you can insert it. The neck spring keeps the liner ridged so it can be fed into the torch with no issues and keeps the wire from kinking. It also helps protect the liner from getting too hot and melting inside the torch.
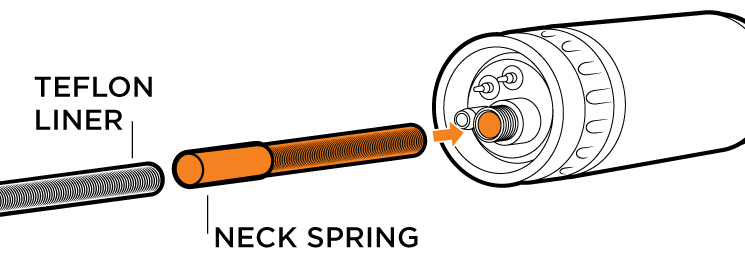
The neck spring will butt up against where the tip holder screws in inside the neck of the torch. The excess liner will instead hang out the back of the torch (towards the machine side).
Depending on your machine, there are two things you can do with the excess.
1: If your machine has no removable guide tube inside the Euro connection, simply cut the excess off and screw the retaining nut back on.
2: If your machine has a guide tube that can be changed, swap it out for an aluminium specific guide tube, which is slightly larger.
The retaining nut can be screwed back into place with the excess liner hanging out the back of it. Don’t forget to move the collet and O ring so that they are clamped in place by the retaining nut when it’s screwed in.
Reattach the torch to the machine to make sure you can line the liner up correctly. Then, feed the excess liner through the guide tube and into the machine, where it will butt up against the drive roller and hang out past them.
Cut the liner to a length where it isn’t touching the drive roller, but it’s slightly protruding out the end of the guide tube still.
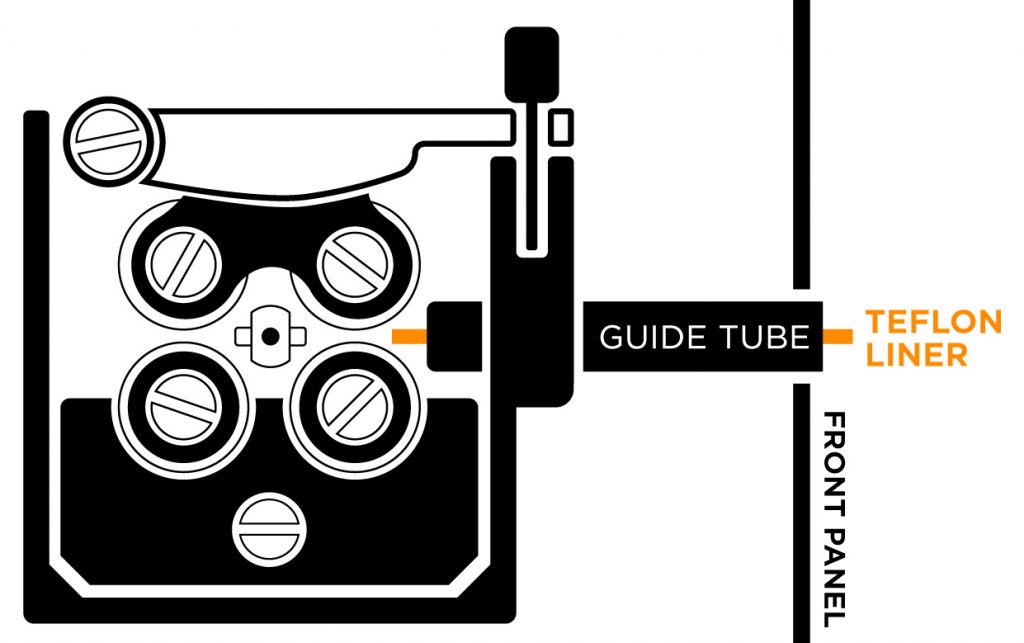
Having the liner go all the way to the drive roller (if possible) helps to stop potential birdnesting that might have occurred if the wire was free to bounce around in the open guide tube.
Finally, replace the front-end parts of the torch.
Checking your liner each time you change out your wire spool means you’ll be able to catch any problems with it early. A damaged or dirty liner is only going to cause wire feeding issues, so if it needs to be replaced, get a new one.