The Top 13 Tips and Tricks for the Best Aluminium TIG Welds
July 3, 2023
TIG welding is hard. TIG welding aluminium is even harder. Aluminium is much trickier to work with, and it can take a lot of fiddling with to get right. Whether you’re a seasoned pro or just starting out, here are some tips that can help make it a bit easier.
1. Fix your joint fit up
It might not seem like a big deal, but when you’re tacking pieces together while prepping a weld, how well they’re joined makes a difference.
When fitting up a joint, it’s important to make sure that everything lines up evenly. You don’t want one corner of a joint to be perfectly flush while the other end is way off. A small gap or slowly widening joint can cause issues as you try to weld over it and fill it in.
Gaps in your fit-up make it much easier to burn through, so double-check that everything is lined up nice and even before you go ahead with the proper weld for the best results.

2. Use MIG wire as filler rod
If your filler rod is too thick compared to your base metal, it isn’t going to get hot enough to melt. Your base metal will melt (and likely blow through) before the rod starts to melt. You’ll find that your filler balloons or balls up at the tip before falling into the weld pool, and generally won’t feed very well.
If you’re welding on really thin material, and the 1.6mm rods are still too thick, make yourself some filler rod using a length of MIG filler wire. MIG wire spools are precision wound, so the wire won’t be straight when you cut lengths off the spool, but you can fix that fairly easily.
Clamp one end of the wire in a vice (or another clamp system) and the other end in a drill. Stretch the wire so that it’s pulled straight and, pulling on it to keep it taut, start drilling. “Drill” the wire until it snaps at the end, and you’ve got a piece of straightened MIG wire. Cut off the curly end that’s left over from the drilling, and it’s ready to be used as a TIG rod.
3. Clean your tungsten and consumables
If you’ve dipped your tungsten, or it’s become oxidised, grab a new one. Even a tungsten that hasn’t been dipped can be dirty, which can cause serious issues with your arc starts. Even if you haven’t dipped it, if you notice your arc deflects and wanders as you start a weld, grab a new one.
As well as your tungsten, you want clean consumables. Use the end of your tungsten or a wire brush to scrape out any spatter that may be on your gas lens or inside the cup. Spatter or other bits stuck on either can cause gas deflection, which means it won’t come out evenly, leaving parts of your weld vulnerable to the atmosphere.
Keeping your consumables clean will prevent contaminants from being blown into your weld and keep your gas where it’s meant to be.
4. Is your AC balance correct?
The AC balance of a machine is the amount of time spent in the negative and positive parts of the AC cycle. A general setting that will work for almost every weld is a 30% positive and 70% negative ratio.
If you have too much negative balance selected, you’ll find you get a weld that looks dirty, crusty, or frosty, and it isn’t the gas causing the issue. It can also misshape your tungsten, which will lose its tip and deform into a weird shape.
If your balance is too far on the positive side, your tungsten will turn into an excessive ball shape very quickly. The arc will usually flutter wildly before the tip of the tungsten melts off entirely into the weld pool, contaminating your weld.
5. Adjust your frequency to suit the job
Most inverter machines these days can adjust their welding frequency (or Hertz), which you should do to suit the metal thickness you’re working with.
A higher frequency, like 120Hz, will narrow your arc, giving you a tighter weld, great for welding in corners or on thinner materials. However, a higher frequency also gives less penetration.
A lower frequency, around the 50-90Hz range, will give you a wider arc and, therefore, a wider weld pool with more heat and penetration.
The standard base setting is usually around 60Hz, which is a good all-around setting that works for almost everything, but it can be finetuned to get an even better weld.
6. Clean your aluminium, and then clean it again
So many of the most common issues people run into when trying to weld aluminium can be caused by insufficient metal prep. It can be time-consuming to thoroughly clean all your metal, especially on big projects or lots of small repetitive welds, but it’s more time-consuming to redo failed welds.
There are a few steps to take to get your workpiece as clean as possible. First, wire brush the joint lengthways, preferably in only one direction, making sure to brush all the way off the edge to expel all the contaminants you’re removing. Use a dedicated stainless steel wire brush to avoid brushing bits of contaminant from other metals into the aluminium.
The next thing to do is run a scotch bright pad over everything to be extra sure it’s clean. (This step is optional.)
Finally, to make sure everything is spick and span, wipe your aluminium down with acetone (or rubbing alcohol) and a clean rag to remove the oxide layer.

7. Double dip your tacks
Don’t start your welds from a bad tack. If your tack has melted off part of the base metal and your starting point isn’t great, getting a good weld going will be a challenge.
You want a good foundation to start your puddle from, so make your tacks nice. If they’re just slapped on there, or they’re too big, or too much base metal has melted away, or it’s hanging over the edges, it’s going to make it harder to get a nice weld.
Aluminium doesn’t like being autogenous (fusion) welded, so it’s best to make your tack using filler, dabbing enough to fuse the joint without it being too big. Then add another dab, creating a tack that’s the same size as you want your weld bead, so it’s much easier to come back and start a nice puddle. It should almost look like the start of a weld rather than just a simple tack.

Add extra filler to your end tack as well, so you’ve got extra ‘meat’ when you reach the end of the joint. That way, you won’t have to worry about it blowing out at the hottest part of the weld as you finish.
If you’ve done your tacks and they haven’t turned so great, you can neaten or feather them out with a grinder, or just remove them entirely and try again.
8. Take your time at the start
Don’t just arc up and go. Your weld won’t have time to pool properly, the filler isn’t going to wet in properly, and it’s not going to give you the start you want.
Instead, start the arc and then pause. You want to let your puddle establish before you start going. Wait for a few seconds, let the cleaning action happen, then add a bit of filler as it starts to form a puddle, letting everything sit down properly and blend into the base. Once it’s about the size and shape you want, you can go ahead and start adding filler and go along the weld.
Aluminium needs some extra time to form a weld pool, as the arc needs to first clean through the oxide layer before it can start puddling. Pause for a few extra seconds than you would with steel to let a proper puddle form before you start moving along the weld.
9. Use the right amount of filler material
Your filler rod can have an effect on the heat of your weld. Because the filler rod is cooler than the weld pool, each time you dab, it slightly cools your puddle.
If you don’t use enough filler, especially at the start of your weld, you can overheat your plate.
On the other hand, using too much filler can cause your weld bead to build up on itself, and it won’t blend, leaving you with a lack of fusion both on the toes of the weld and in the joint itself.
You want enough filler to control the heat and get proper reinforcement but not so much that it chokes the weld.
10. Set your post flow for long enough
Not only does it protect the end of your weld while it’s still hot, but your post flow also works to protect your tungsten. Your tungsten, just like your workpiece, is red hot when you end a weld.
If your tungsten is exposed to the air while it’s still glowing, it can become contaminated, just like a weld would be. When you restart your arc, you’re going to blow all that oxidation and bits of contamination straight into the start of your next weld.
Set your post flow for long enough that your tungsten is shielded until it has cooled down. Ideally, your tungsten should remain shiny and silver after every weld. Hold your torch over the weld while the post flow is running, and keep your weld and tungsten protected from the atmosphere.
11. Read the puddle
Learning to read the weld puddle will allow you to course correct it as you go and give you a good indication of whether the weld is doing what it’s meant to.
One way to tell that you’re getting sufficient penetration is by watching the puddle. Is the weld pool sinking down into the plate? If it is, that usually means it’s penetrating all the way through.
12. Extend your arc as you add filler
The general rule of thumb when it comes to standoff distance when TIG welding is you’re your tungsten should be roughly the same distance from the plate as its width. For example, when using a 2.4mm tungsten, your standoff should be approximately 2mm.
It can be difficult to maintain that distance while adding filler without dipping the rod straight into the tungsten itself. To avoid this, you can lift the torch up slightly (by 1mm or 2mm, you don’t want to lose your gas coverage or arc stability) as you dip the filler rod and then lower it back to normal to maintain penetration as you advance the weld bead.
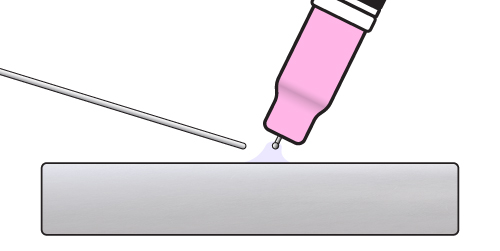
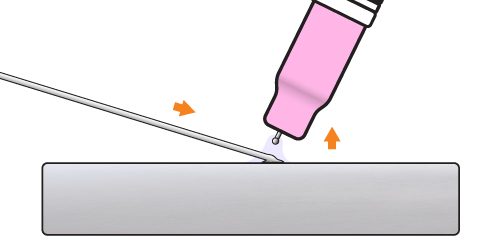
By moving your torch out of the way as you feed in rod, you remove the risk of contaminating your tungsten by touching the filler to it or by accidentally dipping it into the growing puddle. It can take a bit of practise to get the timing perfected, though.
13. Polish your welds if they’re going to be visible
You can purchase aluminium polish, so if you have a weld that will be visible or not painted over, you can polish it up to make it extra shiny. Tape around the edges of your weld and polish away. While polishing away, it can look rather dirty, but once you’ve wiped it down, you’ll be left with a gleaming weld ready to show off.