Troubleshooting MIG Wire Feeding Issues in Your Welder
April 11, 2022
Like with most welding issues, wire feed problems can be caused by a number of things, and you’ll want to check them all to make sure you’ve fixed it permanently.
Starting from inside the machine and working our way through to the torch, here’s how to troubleshoot every potential issue you might face.
Have you got good quality wire?
The first thing that goes into your MIG welder is the spool of wire. The actual quality of the wire can make a difference to how smoothly it feeds. Make sure to get good quality MIG wire that meets the Australian and New Zealand standards at a minimum.
You’ll also want a wire spool that’s been precision wound by a machine, which these days they mostly are. If you open up your spool and it looks like it’s been randomly wound with wires overlapping all over, it’s not going to feed well. Good quality MIG wire is precision wound for the smoothest possible feeding.
If your MIG wire spool has been sitting in the garage for a while, you should check that it’s still okay to use. If it wasn’t sealed before it was put away, moisture and prolonged exposure to the air might have caused it to rust.
Running rust through your torch liner will cause even more issues, so it’s best to avoid it entirely. If you do see rust on your spool, there’s a good chance that rust goes all the way through, and you’ll need to get a new one.
When you’re done with a roll of MIG wire, place it in a plastic bag or wrap it up in some cloth. Anything that helps keep moisture and air out, so you can get the most from it for future uses.
Is the spool loaded in properly?
The nut used to secure the spool in place is called a ‘spool retaining nut’, and it is there to hold the spool in place and keep it from free spinning.
If the nut isn’t tight enough, the spool will spin freely and potentially come loose from the spool holder, leaving you with a mess of wire.
Your spool should be hand tightened and not loose at all to ensure that it spins properly and brakes.
You should also check that the spool is lined up with the alignment knob on the spool holder. If it’s out of alignment, the spool won’t brake properly when the trigger is released, and your wire will come loose.
Check the wire feeding unit itself
The feeder relay unit, more commonly known as the unit powering the drive rollers or wire feeding unit, might be faulty. If this is the case, unfortunately, there’s not much you can do to fix this yourself.
If the wire doesn’t feed at all, or it shudders and feeds erratically, there’s a chance it’s your feeder unit. If your feeder relay is the problem, you’ll need to take your machine in for a service.
Drive rollers
There are a couple of things that need to be checked when it comes to the rollers.
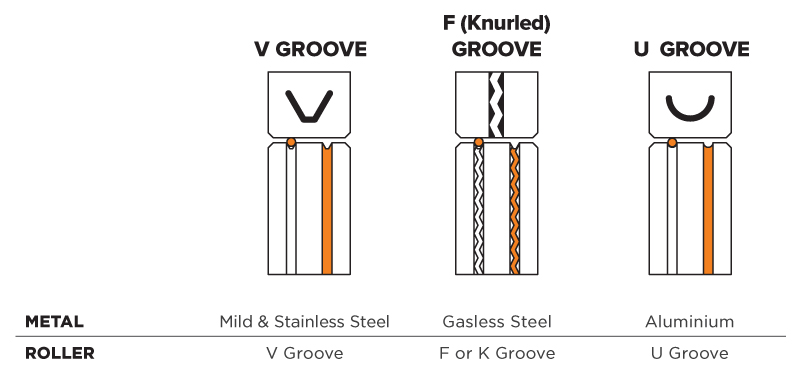
First, make sure you’re using the correct drive roller for your metal type. V groove rollers are needed for mild and stainless steel wires. F (flux) or K (knurled) groove rollers are required for gasless flux-cored wires. U groove rollers are needed for aluminium.
Second, make sure the roller is the right size. Your roller and wire should be the same size so that the roller can properly grip the wire, but it’s not squished in. For example, if you’re welding with 0.9mm wire, your roller should also be labelled 0.9mm.
Most drive rollers come with two sizes on the one roller, so you could have a roller labelled 0.8 on one side and 0.9 on the other. These labels usually correspond with the groove closest to it, so just check that you’re loading the roller into the machine the right way.
Third, make sure that the tension is correct. The drive rollers have a tension adjustment knob, which doubles as the locking mechanism for the rollers. If there isn’t enough tension on the rollers, the wire will slip. If there’s too much tension, it can cause deformities in or flatten the wire.
You can check you have the right amount of tension by feeding the wire through your fingers (while wearing gloves). Grip the wire lightly, and if the wire feeds smoothly without being stopped or slipping, it’s the right amount of tension.
Keep in mind that the grooves in driver rollers can wear down over time and lose their shape, so they’ll need to be replaced every now and then.
Lastly, make sure your rollers are actually spinning. If the drive rollers aren’t rolling at all, it’s a more serious issue. An electrical continuity failure in the machine is the main reason your rollers would stop working.
If there’s a failure with your electrical components, you’ll need to take your machine in for a service.
Liner
Like your drive rollers, you’ll need to check that your liner is the right type and size.
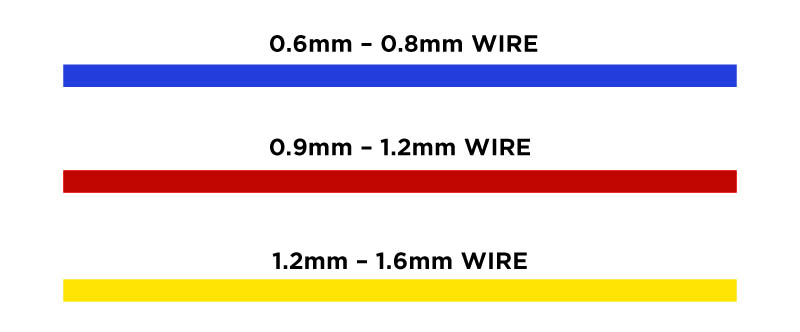
Your liner size should be able to accommodate the size of your wire. Torch liners are colour coded, so you can tell on sight whether it’s the right one.
These liners are all designed for both gas and flux-cored steels. For aluminium, you’ll need the Teflon version of these liners. The different material is designed to make wire feeding softer metals easier. They also have a neck spring that the steel liners don’t, so it’s easy to tell them apart.
If you’ve got the right liner type and size, the last thing to check is that it’s fitted properly and it’s not blocked.
Over time, bits of wire debris can build up inside the torch liner, narrowing the hole and making it harder for the wire to feed. You can blow some of it out, but generally, you should replace your liner if it’s full of gunk.
Quick tip: Swapping your liner to a Teflon one when welding with aluminium means you won’t be feeding your temperamental aluminium wire through steel shavings. (Saving you from dealing with issues caused by contaminated aluminium.)
If your liner is still clean, check that it fits in the torch properly and it’s been cut to the correct length. There shouldn’t be any overhang, but if it’s too short, that can also cause wire feeding issues.
Finally, make sure the liner hasn’t been kinked. Even if your torch is straight, your liner might still have kinks from previously being bent. These small kinks can affect how well the wire feeds, so if you can’t straighten them out, you’ll need to get a new liner.
Contact tip
Your contact tips are pretty similar to the torch liners.
There are aluminium specific contact tips available, so make sure you haven’t accidentally left your steel tip on for an aluminium wire (and vice versa).
They’re also sized, so you can match them to your wire size. The contact tip size dictates how wide the borehole is, so a tip that’s too small won’t allow the wire to even feed through.
On the other hand, too big a contact tip means the wire won’t make contact, and it won’t become electrically charged, so an arc won’t ignite.
Quick tip: Take your contact tip off when you feed a spool through your torch for the first time. The wire might catch even if it’s the right size, leaving you with a birdsnest while trying to set up. You can slip the tip back on over the wire once it’s through the torch.
Contact tips wear down, and you can’t use the same one your machine came with forever. If your tip is visibly worn or damaged (e.g., from wire burning back), you’ll need to replace it.
They can also become blocked, which you can clear out. If it can’t be cleared, chuck it out and grab a fresh one.
Torch leads & trigger
If your wire isn’t feeding at all, check to see if your torch trigger is working. Use the wire feed button that’s usually found inside the machine to feed your wire through the torch lead. If that works, your trigger is likely broken and will need replacing.
The other reason your wire might not feed is because of a broken control lead inside the torch. If this is the case, you’ll also need to replace the torch.
Some other things that can cause issues with your wire feeding are the torch length and how straight it is.
The longer your torch is, the harder the driver rollers have to work to feed wire to the end. This is especially true of softer metals like aluminium, which are already difficult.
The average torch length is 4m, but if your wire is really struggling, dropping down to a 3m torch could make a real difference.
It’s also a good idea to try and keep the torch as straight as possible. Putting tight curls or having the torch lead double back on itself might kink your liner (see above), which will cause problems. It doesn’t have to be dead straight, but keep any loops in the torch as loose as possible.
If you’re really struggling, especially with softer wires like aluminium, you should try a push-pull gun. They come with a small motor in the torch itself, so the wire isn’t just being pushed the whole way; it’s being pulled through the torch as well.
Not every machine is compatible with a push-pull gun, as they don’t all have the right connection, but if it does, they’re a great option.
Other things to check
Here are a couple of other things you can check if you’ve tried everything mentioned above and you’re still experiencing issues with your wire feeding.
- Earth clamp – make sure the lead is plugged in and connected to the workpiece or close by on a metal table that the workpiece is touching. A bad ground can cause an erratic arc and wire feeding problems.
- Polarity – check that your earth and torch are plugged into the correct panel mounts for the metal you’re welding. If you’re unsure which polarity is correct, check out our Ultimate Guide.
- How long your torch is – when welding thin gauge wires like 0.6mm, a shorter torch is best. A 3m torch will mean the wire doesn’t have as far to travel, so it won’t have space to kink (as much as a 4m torch).
When it comes to wire feeding issues, there are a lot of steps you can take to try and fix the problem and get the machine back to running smoothly. However, if none of the above solutions work, your next step should be taking your machine in to get it serviced.