How to Build a Floating Wine Bottle Holder
April 4, 2022
Are you looking for a new, fun way to display your wine bottles? Don’t want to spend a fortune on something you could easily make yourself?
Well, why not have a crack at your very own DIY wine holder? Not only is it super simple, but rather than spending $50, you could save and spend just the cost of the metal (which cost us about $15)!
What You’ll Need
Metal
- 40mm x 3mm mild steel flat bar (you’ll need 5x 120mm pieces)
- 48mm (OD) x 42mm (ID) mild steel pipe, cut to 75mm long
Tools
- Combination square
- Half round file
- Angle grinder
- Chalk
- Rule
- A piece of packing strap or similar
- (optional) Spray paint
STEP 1
Measure your flat bar. If you’ve got yourself one long strip of metal as we did, you’ll need to measure out five 120mm pieces with your chalk.
STEP 2
Cut the metal where you’ve marked your five lines, using your angle grinder.
STEP 3
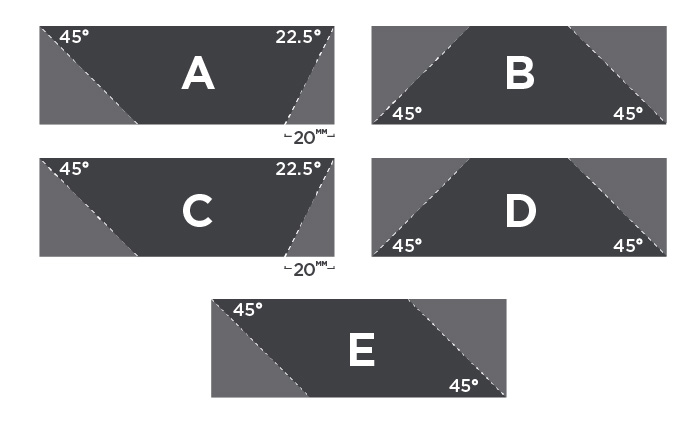
Measure out your cross angles. Now that you have five strips of equally sized metal, you can go ahead and mark out the required angles needed to make the pieces fit together later. Because of the way the base plate is shaped, they don’t all get the same angles.
On two of your pieces, measure a 45° angle from the corner on both sides.
On two of your pieces, measure a 45° angle from one corner. On the other side, measure 20mm from the edge on your plate. Then, draw a line from that mark to the corner.
On your last piece, measure two 45° angles. These two lines should be parallel to each other, as this will be your upright piece.
Your angles should look like this:
STEP 4
Once everything is marked, cut out your angles. We recommend placing the metal pieces in a vice while you cut them with the grinder.
STEP 5
Next is the pipe. Set your combination square to 75mm and mark from the end of the pipe. With your initial mark made, grab your piece of packing strap and wrap it around the pipe. You can trace along the edge of it to get a perfect circle all the way around.
STEP 6
Cut your pipe to size.
If your piece of pipe is already 75mm, you can skip these two steps.
STEP 7
Clean up your bits of metal. Once your pipe and flat bar have been cut to size, make sure to clean off any burs with a grinder and flap disk. To get any burs that are on the inside of the pipe, grab your half round file and run it around the edge. You want everything to be smooth.
STEP 8
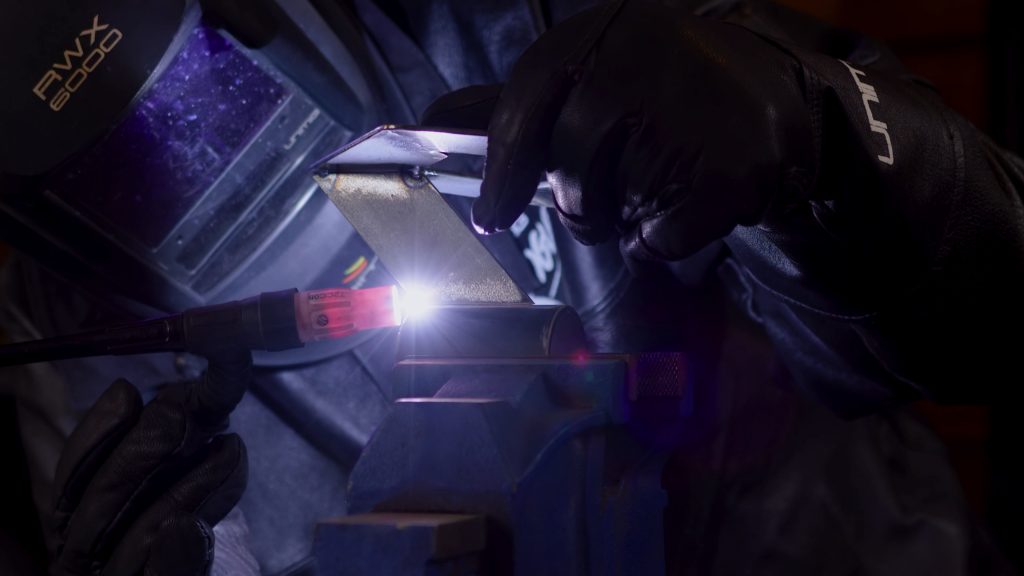
Now for the exciting part: the welding.
We used the RAZOR 200 AC/DC welder with the following settings:
- Set: DC
- Trigger: 4T
- Tungsten: 2.4mm
- Pre-gas: 0.2
- Start amps: 80
- Up slope: 0.2
- Peak amps: 90
- Down slope: 0.2
- Finish amps: 80
- Post-gas: 0.5
First, tack together your four base plates, making sure that everything lines up properly.
The two pieces with outward-facing 45° angles will fit together at the top. The two smaller angles, which you measured 20mm into the plate on, will then join to the bottom of those, creating a diamond with an open end.
It should look like this when done correctly:

When they’re all lined up and tacked, you can weld them together. Once you’ve finished all your welds, sand them flush using a flap disk. For a sleeker look, you can round off the corners of your base plate as well.
STEP 9
With your base plate finished, move on to the upright piece. Your base plate should have an open end and a closed end. You want to tack your upright piece in the middle of your closed end. You can line it up against the weld holding the two base pieces together.

When you’re tacking this piece, make sure that it points outward, in the opposite direction of the open side of the base. It should look like it hangs over the outer edge. You can use a 90° magnet to hold it up while you tack it.
STEP 10
With your upright piece tacked, move on to marking a line along the axis of your pipe. You can do this in any way, but we’ve used a piece of angle that fit snug around the pipe to keep our line straight.
STEP 11
Tack the pipe to your upright piece. You only want to have these tacked first to make sure everything lines up. It’s a lot easier to snap tacks than it is to get rid of a full weld if one of the parts goes wonky.
STEP 12
Weld the upright piece and pipe together. When they’re done, give them a clean with your wire brush, and if you want, hit them with the flap disk as well.
STEP 13 (optional)
Your gravity defying wine bottle holder is now done! But, you don’t have to leave it as is. If you want to, grab yourself some spray paint (we used semi-gloss black with primer) and give it a few coats.
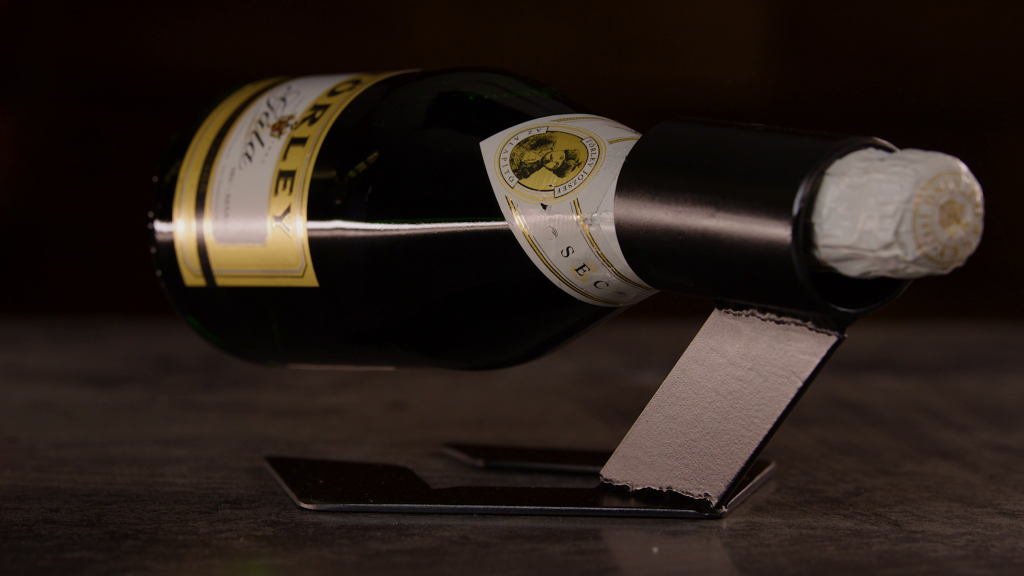
Now you can impress all your future guests with your welding skills and the wine holder.