12 Tips & Tricks for the Perfect Colourful TIG Weld
February 28, 2022
When it comes to coloured welds, you’re pretty much limited to TIG on stainless steel. There are titanium and other alloys that will colour, but they’re incredibly rare, and if you’re only trying to make artwork, they’re not really what you’d use anyway. For this, we’re going to stick to colouring stainless steel and how you can make some really bright welds.
How and why are some welds colourful?
There’s a decent amount of science behind the how’s and why’s of metal colouring, but we won’t bore you with that. The short of it is that heating steel changes its molecular composition, which reacts with elements in the atmosphere as it cools. This is called oxidisation. Depending on what’s in the air and what temperature the metal is will dictate the colour.
Because the colouring comes from the metal being exposed to the atmosphere and oxidising, it should be avoided on critical welds. Oxidisation can lead to problems with corrosion (it minimises the corrosion resistance), and while you can make a colourful weld that’s strong, it takes a lot of skill.
A coloured weld is not necessarily a ‘bad’ weld, as most colour is the result of surface-level oxidisation. However, anything deeper than surface level is a bad weld and would need to be redone.
That’s why, for anything structural, or really anything integral to what you’re making, avoid colour. It could rust later on, and if you’ve put a nice looking purple weld on your car exhaust, there’s a chance it’s going to rattle itself off.
There are applications where you can get away with some colour. For example, sanitary fields, like dairy and foodservice, will allow for some colour (usually up to light blue). Still, this equipment is also always passivated afterwards to restore the corrosion resistance. Passivation is kind of like an acid bath, and any colours are removed during this process, which is why there is some leeway.
What affects the colours?
Essentially all of the basics of TIG play a role in your colouration.
- Torch angle
- Gas coverage
- Heat input
- Travel speed
- Amperage
Adjusting one of these can impact the others. If you make your torch angle too extreme, you could lose the required gas coverage, or if you turn your amps down, then you have to slow your travel speed to create the proper pool, but this can increase your heat input. They’re all intertwined, so getting good colour on the weld can take a lot of practice and mucking around.
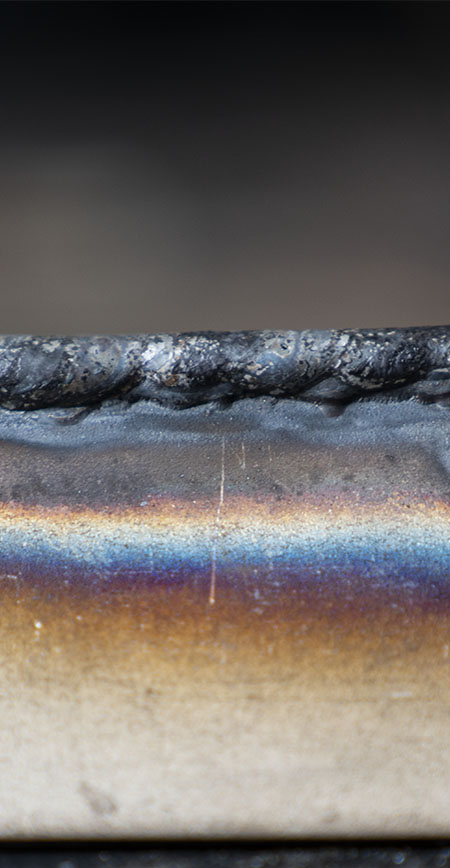
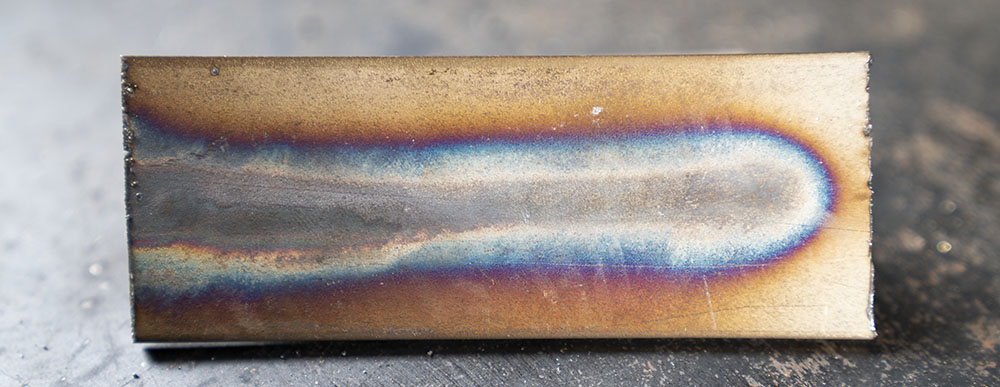
Colour scale
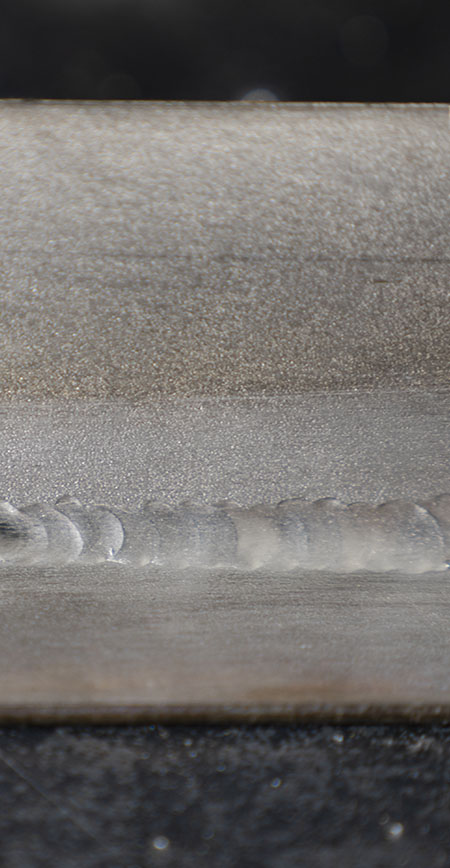
Chrome / No Colour
No colour means no oxidisation, even at the surface level, which makes it the most structurally sound, and you’re not going to have any corrosion issues.
This is usually the colour that the very end of any stainless weld turns because it receives the full post flow duration (as it should to prevent cracking!).
If you’re making art, keep in mind that your last dot at least is going to be lighter than the middle or even beginning.
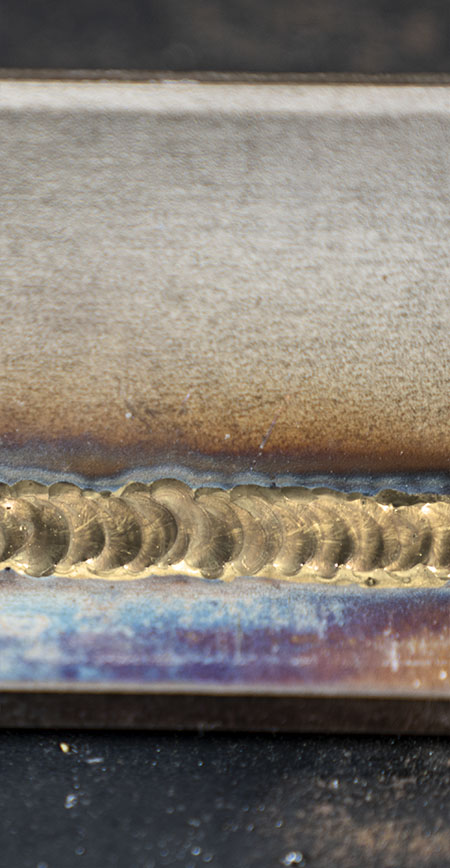
Straw / Yellow / Gold
These are perfectly acceptable colours. There’s barely any oxidisation, so they look nice while still retaining all the necessary strength needed for a good weld.
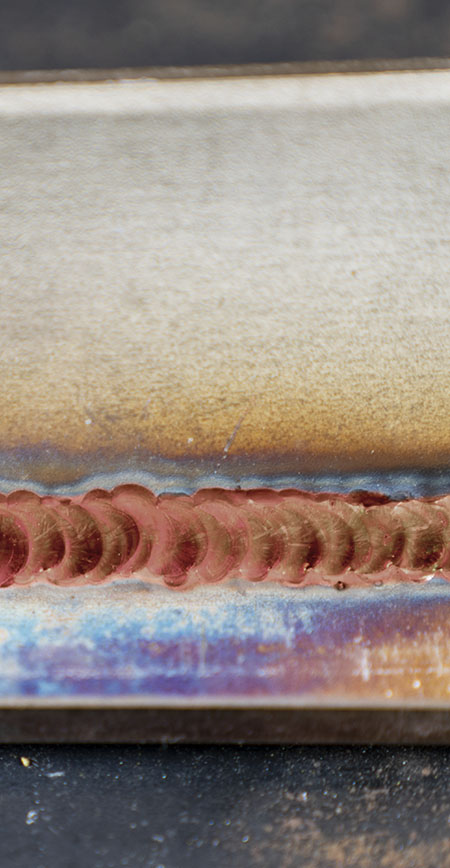
Red
Red is the middle ground. If it’s a critical weld, you’re starting to get too warm, but it does look really good.
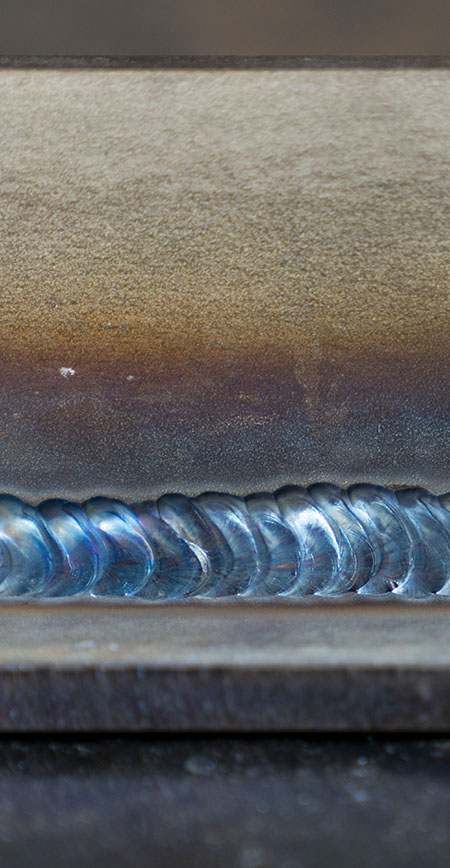
Blue / Purple
Colours this dark mean your metal was hot when it was exposed to the air, so they’ll have plenty of oxidisation on the surface, even though it looks good. You’ll find that some of your welds that turn out blue or purple (particularly the darker shades) also start to develop the ‘skin’ look (imagine very wrinkled skin) because of this extra oxidisation.
Dull Grey / Black
If you’re getting these colours, the weld has just been absolutely cooked. It was way too hot, and it’s now completely oxidised, not only on the surface but all the way through. All of the corrosion resistance that makes stainless steel ‘stainless’ has been totally burnt out.
To top it all off, it just looks really bad, so even when you’re making art, you want to avoid these colours.
Making Coloured Welds
When it comes to making coloured stainless welds, there’s no ‘one size fits all’. The way you set your machine will vary, and everyone has their own unique way that works for them.
A lot of it is mucking around and tweaking as you go until you find a way that consistently produces colour. There are, however, a few things that you can try if you aren’t getting as much colour (or too much) as you were hoping for.
1. Adjust your angle and heat input
Before changing anything else, play around with your heat input and angle. Of course, this also means increasing or decreasing your travel speed to determine your heat, and changing your angle will also affect your gas coverage. But changing these two things first will generally have the most impact.
More heat means more colour, and a steeper torch angle (like 45°) will severely decrease trailing gas, which means more colour again as the weld will be hotter when exposed to the atmosphere.
2. Gas, gas, gas
There are two things to consider when you’re talking gas. Gas flow and gas coverage.
The gas flow is how much gas is being pumped out of the cylinder. The gas coverage is how much of your weld is being covered by the gas being pumped out. You can have a high gas flow and still have poor coverage, and vice versa.
Because the colours are determined by heat, how much gas hits your weld has a pretty significant impact, as the gas cools things down. However, you still need proper coverage so that it doesn’t become fully contaminated and cause weld defects. You definitely can’t just take it away to get a hotter (see: coloured) weld.
Here’s where gas lenses and gas shrouds come in. Gas lenses can give a more stable gas flow, therefore covering the weld pool with no air pockets or turbulence, as the screen in them spreads the gas more evenly.
More gas equals less colour because the metal will have cooled more before it’s fully exposed to the air. Therefore, a good way to get colour is to put a small gas shroud (ceramic cup) on your gas lens.
You can keep all the benefits of a more stable gas flow while exposing your metal to the atmosphere faster because there’s less trailing gas with a smaller nozzle.
Having a range of different sized gas shrouds will give you the opportunity to play around with gas coverage and see what works best for giving you colour and a protected weld. UNIMIG’s ARC TORCHOLOGY TIG torches come with cups in sizes 4 to 10, so you can get narrow nozzles to wide ones.
3. Try this technique
If you’re not getting the colour you’re looking for, try this to increase your heat input. Lower your amps (not crazy low, say 100A on a 2.4mm tungsten) with a slower travel speed and a gas lens with a #7 (or mid-ranged but on the narrow side) cup.
Then, use a thinner filler rod and add only a small amount in each dab. All of these things keep your piece hot so that you can gain more colours. However, if you can see that your metal is getting too hot, you can add more filler and move faster to slightly cool it.
Otherwise, you can also change your gas shroud to a slightly larger one or turn your gas flow up a little bit if it’s still getting too hot. Running it hot and moving faster is definitely the preferred method, though.
4. Overheating?
If your piece gets too hot, you can end up with a very large heat affected area (this is called the heat affected zone or HAZ). The HAZ is the coloured halo that surrounds a weld. Even if your workpiece is hot, you might not get much colouring, or it might look really faded.
This could be because you’re toeing the line between colour and that dull grey you get from overheating, which you want to avoid.
Pausing to let your piece cool in between passes will help maintain bright colours, keep your heat zone halo thin and lessen distortion if you’re welding thinner metal.
5. Foot pumping
The foot pedal is essential if you’re trying to make a coloured weld. They’re great because you can increase or decrease the amperage at will and add or remove heat as needed.
A foot pedal also means you can do manual pulse welding, which you can play around with for the perfect on the fly settings. If you have a machine that doesn’t have pulse options, then a foot pedal is perfect. If you do have pulse options though, you don’t necessarily need one.
Pulse welding means you have more control over the heat and can, in general, keep the piece cooler because the arc is fluctuating between a high and low point. While this is good if you have a uniform, straight line, all the same size weld, it’s not so simple if you’re doing artwork.
If you’re trying to make a creative piece, and a line starts thick and ends thin, you’d need to go back and change the frequency that your arc pulses at every time there’s a change in line weight. That’s why, when you’re making coloured welds, manual pulsing is great; you can adjust how it pulses as you go without stopping and starting your weld.
The best way to use your manual pulse, or foot pumping, is by backing off when not adding filler and then pumping it (putting your foot all the way down) as you add filler. The burst of heat helps to melt the metal and make the actual weld hot while keeping the workpiece cooler.
Note: If you’re using a TIG machine that lets you input settings like start amp, up-slope, down-slope and finish amps, you don’t need to program these in when using a foot pedal, as that’s all dictated by the pedal and any machine settings will generally be overridden.
6. Post flow
Post flow is needed for all TIG welding, as it helps cool the weld (as well as the tungsten) and protects it from contamination.
Unlike MIG welding, though, you can adjust the amount of post flow at the end of the weld. Even if you’re making a colourful stainless steel weld, you need post flow.
It sounds counterproductive. Why do I want to cool my weld when it’s all about heat? There’s a good reason for it, though.
Your stainless is not immune to weld defects. Yes, your post flow will probably make the end of your weld lighter than the rest, maybe even colourless. But, without it, you’re compromising the metal entirely and likely to get a dull grey colour or cracks at the end instead because the metal was contaminated (while in its liquid form) by not letting it cool.
How much post flow you give to a weld is personal preference, but when you’re trying to leave it coloured, a good starting point is around 4 to 6 seconds.
7. Metal thickness
Your metal thicknesses impact how the colours will turn out. Thicker base pieces will take longer to heat and form puddles, and thicker filler rods will need more amps to melt them. The filler rod also cools the weld pool (cool metal in hot pool = cooled pool), so how much filler you add will affect the colour.
When you’re practising making colours, it’s a good idea to start with a thicker base metal as it’ll be able to absorb more heat without your weld going black or blasting through it entirely.
8. Outside influences
Your environment is going to have an influence on your weld. What that means is if you’re in your garage and you’ve got the door closed, your colours could turn out perfect, and you’ve finally found the right settings.
Open the garage door, or change the room temperature drastically, and those settings are straight out the window.
Things like a breeze, even if it’s a light one, can make a real difference to the gas coverage (by blowing it away), and a freezing room can change how cold your base metal starts, which affects how fast it absorbs the heat.
Trying to keep your workspace as controlled as possible while you’re still learning will definitely help with mastering the settings.
9. Etching
If you’re making a proper art piece (as opposed to practice beads or otherwise), drawing an outline as a guide means you can perfect distances and shapes and check symmetry.
Once your drawing is spot on, running over it with an engraving pen will give you sharp, easy to see lines that you can follow as you weld.
Make sure you re-clean your workpiece super well (with acetone or equivalent) afterwards though, permanent marker residue in your weld is probably going to cause contamination.
10. Colour control
You can’t control the colours you get.
Yes, there is a colour order based on the heat input. Yes, more heat means more colour. Regardless of both those facts, it’s really hard to consistently predict or even achieve the same colour all the way across a weld.
If you’re doing a continuous weld, there’s a good chance it alternates between gold, red, blue and purple in a random order. Maybe it starts purple and then fades red before going blue and then turns gold.
No, this doesn’t really make sense, considering the material heats up as you go. You’d assume the start would be gold and the end purple, but in reality, it’s hard to control, and there’s no guarantee that it’ll come out the exact colour or order that you were hoping for.
You can even get more than one colour on the same dab. Sometimes your bead is half gold and half purple. Even though heat dictates the colour, and a weld gets hotter as you go, there are other variables.
You still have control over the amps (especially seeing as you should be using a foot pedal), your filler metal dabs might not be even, and are you keeping your travel speed consistent? These things have to be factored in, which makes it really hard to try and weld an exact colour, especially given you can’t actually measure the metal’s temperature.
If you’re making art, don’t set your heart on a design that HAS to be red, blue, or otherwise. If you get good colour, it’s a win. Don’t forget that if your weld is too hot, you’ll burn out all the properties in the metal, which will leave it that dull grey you’re trying to avoid.
11. What if I want no colour?
If you want to get a chrome-coloured weld in your artwork, keeping the weld cool is key. A good way to do this is to pick up your travel speed, increase your gas flow (not too much that you get turbulence, though), make sure you’re using a gas lens, chuck on a bigger gas shroud and add more filler if possible.
Maybe you won’t need all of these, but they each help to keep the weld puddle cooler and less coloured. A non-coloured weld on the artwork can work for borderlines or make details pop because they’ll stand out against the colours.
12. Finishing touches
You can’t clean your art piece once it’s done, not properly anyway. On a typical weld, you would go over the final result with a wire brush just to make sure it’s clean.
However, because the colours can come off, as they’re only surface level, you aren’t going to be able to clean the final product. Any heat affected zone (HAZ) halos will remain on the piece.
You can, if you have open spaces and the patience, sticky tape over the welded sections and run a wire brush or scuff pad over those spaces to remove any of the discolourations there. Having shiny clean spots will make your colours pop, but sometimes it’s just not possible.
Having these halos is not always a problem. They can create their own rainbow colouring as well, which gives its own effect to a piece.
Producing a colourful weld definitely takes a bit of trial and error, but hopefully, these tips help to get you started, and if they have, you should shoot through some photos of what you’ve created!