Troubleshooting Your Weld – The 12 Most Common Problems & How to Fix Them
May 6, 2021
When you’re learning a new skill or face a new situation, you’re probably going to run into some issues while you get a handle on it. That’s fine. Being able to identify what the problem is and knowing how to remedy it can save you a lot of head-scratching and frustration. We’ll cover the most common weld defects you might encounter when welding, teach you how to recognise them and help fix or prevent them in the future.
Quick Navigation
Jump to:
- Porosity
- Cracks
- Undercut
- Overlap
- Distortion
- Burn Through
- Lack of Fusion
- Lack of Penetration
- Slag Inclusions
- Spatter
- Craters
- Convex and Concave Weld Beads
1. Porosity
What is it and what does it look like?
Porosity occurs when elements in the atmosphere are absorbed into the weld pool while it’s still molten. These gases become trapped once the metal solidifies, and you’re left with a weld full of holes. Porosity is often referred to as the ‘swiss cheese’ look because of the little bubbles left behind.
What causes it?
- Dirty parent metal
- Not enough shielding gas
- The wrong type of shielding gas
- Contaminated gas
- Incorrect torch angle or position
How can you prevent or fix it?
- Thoroughly clean your parent metal and give your filler a wipe down
- Clean your consumables and replace any that are worn or damaged
- Make sure all of your equipment is moisture free
- Check your gas flow (UNIMIG recommends 8-12L/min), make sure it’s not leaking or empty
- Check you have the correct type of gas: ArCO2 for MIG stainless and steel, pure argon for MIG aluminium and all TIG
- Angle your torch 45° and roughly 3mm off the joint for good positioning
- If there’s a draft or you’re outside, set up some makeshift walls to block any wind
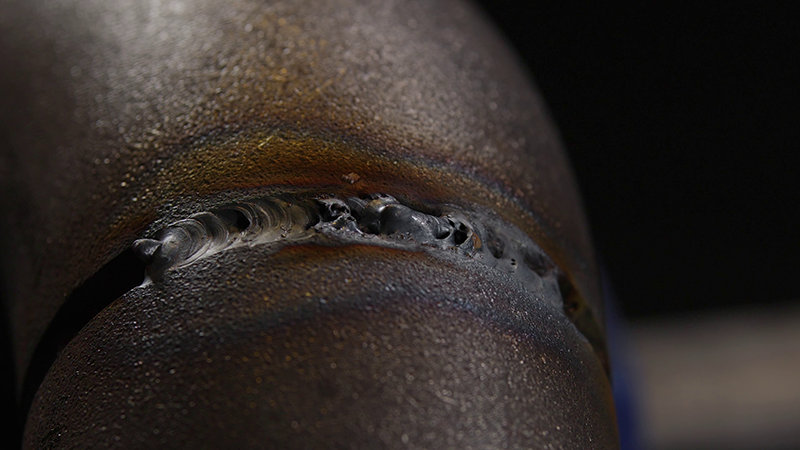
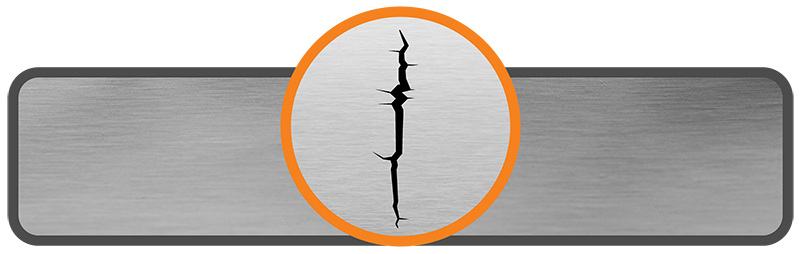
2. Cracks
What is it and what does it look like?
There are 3 types of crack that you can get:
Hot Cracks
Occurs when the strain on the weld pool is too high, or it is forced to cool too fast.
Cold Cracks

Unmalleable material, residual stress (from constant vibration or flexing) and diffusible hydrogen inside the metal can all create cold cracks.
Crater Crack
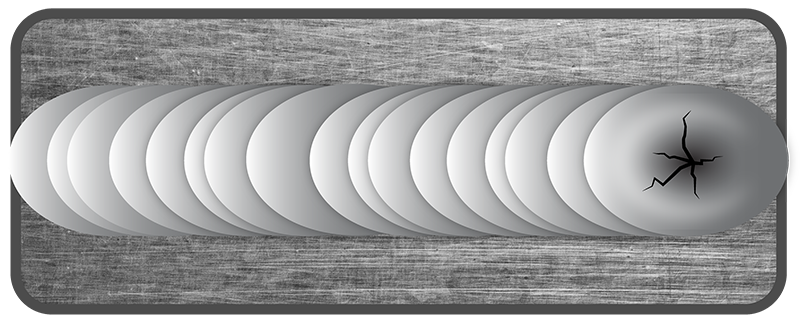
Occurs when the end of a weld isn’t filled properly, a weak point forms and can crack.
Sometimes, a crack won’t immediately form, and it’s not until days, months, or years later that the metal begins to crack. Once it’s there, though, it’ll only get bigger. The problem with cracking in a weld is that you can’t just go back over the top of it and fill it in. You have to remove that part of the weld, or the entire weld, and restart from scratch. If you can prevent the crack from forming in the first place, then it’s going to save you a lot of time and effort.
What causes it?
- The wrong type of shielding gas
- ‘Shocking’ the metal (not cooling it slowly enough under shielding gas)
- Using the wrong type of filler metal
- Not filling the joint in properly, especially at the end (this will cause a crater crack)
- Poor joint configuration and preparation
How can you prevent or fix it?
- Use the correct type of gas for your metal type
- Cool your metal slowly, using an appropriate amount of post flow for your weld (TIG)
- Pre-heating and post-heating your metal so that the temperature range isn’t so severe
- Make sure your filler metal’s tensile strength and metal grade matches or is as close as possible to your parent metal
- Use a ‘backfill’ method to add extra filler at the end of your weld and let the weld build up slightly to prevent craters
- Clean, grind, deburr, bevel and clamp your joint so that it’s lined up as tight as possible with no impurities
- If a crack has formed on your weld, you’ll have to grind the whole thing off and start again
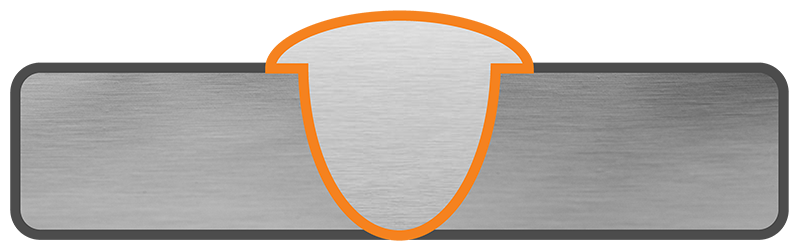
3. Undercut
What is it and what does it look like?
Undercut occurs when the weld gets too wide, and the base metal dips in along the edges (due to poor welding technique), but there is not enough filler material to fill the gap, so you are left with a groove on the toes of the weld.
What causes it?
- Arc length is too long
- Too many amps or too much heat
- Not adding enough filler
- Too fast a travel speed
- Angling the torch too far in one direction
How can you prevent or fix it?
- Make sure to keep a tight arc
- Lower your amps and heat so that you’re not excessively digging into the joint
- Slow your travel speed, so there is enough time to fill in the joint properly
- Keep your torch tip centred on the middle of the joint or towards the thicker metal
- If the pass is wide, or you’ve gotten undercut, use multiple passes to fill it in
4. Overlap
What is it and what does it look like?
Overlap is pretty much the opposite of undercut. There is too much filler in the weld, and the machine is running too cold (not enough amps). The type of joint you’re working on will determine whether you’ve got overlap or not. There’s usually a bit of wriggle room with a butt weld, as the bead is generally slightly convex on these. A fillet weld, on the other hand, should be mitre (flat in the joint). Either way, the bead should be fused into the edges rather than hanging over them.
What causes it?
- Too much filler metal
- Incorrect welding technique
- Not enough heat (amps/volts)
How can you prevent or fix it?
- Use less or a smaller filler wire
- Make sure you’re welding at the correct angle with a good arc distance
- Increase your volts (MIG) or your amps (TIG & stick)
5. Distortion
What is it and what does it look like?
Distortion can also be referred to as warping, in which the metal hasn’t been able to cope with the expansion and contraction that comes with heating and cooling. It often looks as though the metal has begun to pull and warp. A lot of the time, it means there’s been too much heat in the plate, not just the joint, which the metal can’t handle.
What causes it?
- Too much heat
- Travelling too slowly
- Not clamping enough
- Not enough tacks
How can you prevent or fix it?
- Where possible, do short welds or stagger your welds to spread the heat
- Increase your travel speed (but up your amps, so the puddle still forms) so less heat sinks into the parent metal
- Weld on both sides, the metal will often pull towards the weld, welding the opposite side pulls it back
- Let your weld cool in between passes
- Clamp your piece correctly; use turnbuckles and lots of clamps if need be
- Use lots of tacks
- Metal is always going to warp, even if it’s just slightly, once there’s heat in it; the important thing is to minimise the amount of distortion, especially on critical welds
- If you do end up with warped metal, you can go back and re-heat it to fix it; there are plenty of ways to reshape it (e.g. hammer and dolly)
6. Burn Through
What is it and what does it look like?
Burn through is, literally, burning through your metal so that filler protrudes out the other side, or in more extreme cases, where you’re left with a hole.
What causes it?
- Too much heat in one concentrated area
- Too high an amperage
- Too slow a travel speed
How can you prevent or fix it?
- Turn your amps down
- Increase your travel speed
- If you’ve put a hole in your metal, there are
two things you can do
- you’re going to need to start again from scratch and grab some new metal, or
- you can adjust your settings, fill the hole in, grind it down and then weld over it as if it was never there
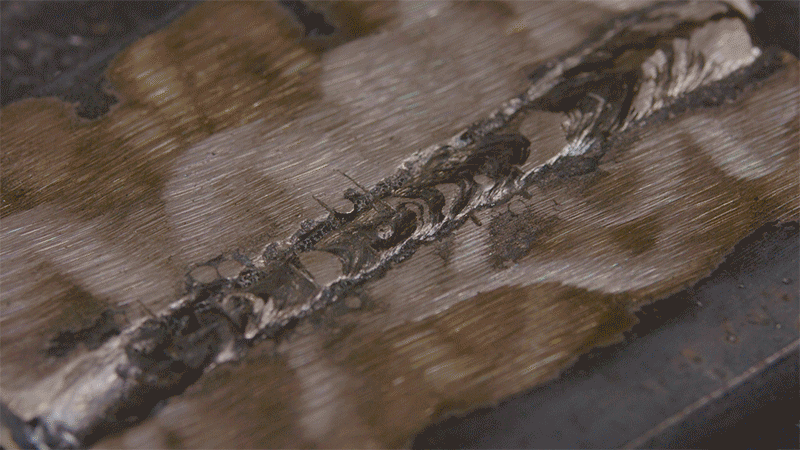
7. Lack of Fusion
What is it and what does it look like?
A lack of fusion occurs when the weld metal doesn’t fuse with the base metal properly. You can also have a lack of fusion between multi-pass weld beads. There are often gaps along the edge of the weld, and it’s usually characterised by a high crown weld bead. You might not be able to see how well it’s fused on the actual weld, but if you can break it apart by placing it in a vice and cracking it apart, then it wasn’t fused together properly. You can also check the fusion with an x-ray or other non-destruction methods.
What causes it?
- Too fast a travel speed
- Not enough heat
- The torch angle is incorrect
- The filler metal or electrode size is not big enough
- Incorrect joint design or fit-up
How can you prevent or fix it?
- Increase your amps and slow your travel speed
- Wait until a wet pool has formed on the metal before moving and focusing on pushing or pulling it along; you want to be in control of it
- Make sure that your joint is lined up properly, with the correct sized gap
8. Lack of Penetration
What is it and what does it look like?
A lack of penetration means that your weld bead hasn’t gone all the way into the joint. The groove or root of the metal hasn’t been completely fused. This is a lot easier to see on a butt weld (that’s not attached to anything), as you can flip it over and check the backside to make sure the weld bead has fused to both sides and filled in the entire space. Like a lack of fusion, if you’ve got shallow penetration, the weld can be deemed faulty for crucial situations.
What causes it?
- Too small a root gap or a misaligned/improper joint fit-up
- Not enough heat
- Too fast a travel speed
- Using an electrode that is too large with amps to match (TIG)
- Poor welding technique
How can you prevent or fix it?
- Check that you’re using appropriate amps/volts/wire speed and travelling at a speed to match
- Make sure that you’re holding your torch at an appropriate angle with a tight arc
- Prep your root gap so that it is not too narrow you can’t get into it, but not so wide you can’t fill it and that everything is lined up
9. Slag Inclusions
What is it and what does it look like?
A slag inclusion occurs when a piece of flux falls off and ends up in the weld pool but doesn’t melt out, becoming trapped inside and contaminating the weld as it solidifies. These only happen when stick and gasless MIG welding, as they’re the only two that use a filler metal with a flux core or coating that can come off. A slag inclusion will typically leave a hole in the weld with the slag exposed.
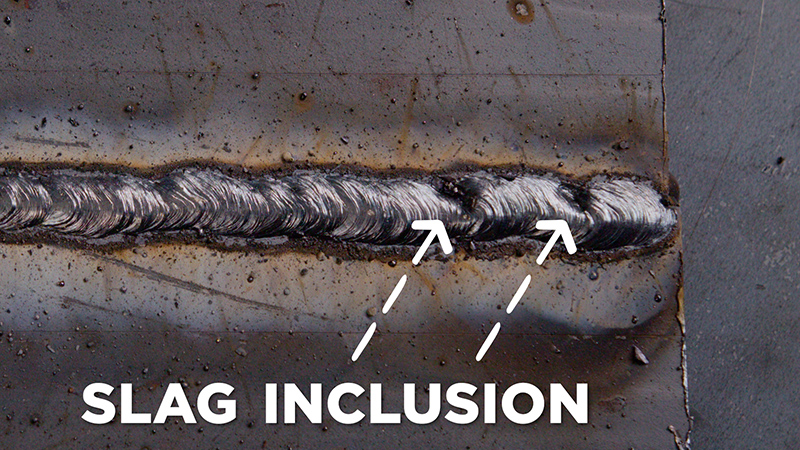
What causes it?
- Slag wasn’t removed prior to the next pass (on multi-pass welds)
- Poor quality or poorly stored electrodes
- Using the wrong welding technique (pushing instead of pulling)
How can you prevent or fix it?
- Store your filler metals in a cool, dry space, preferably sealed in a container
- Re-bake any damp electrodes before use
- Use the proper welding technique: pull (drag) the filler
- Maintain a good arc length
- Clean slag off properly between welds
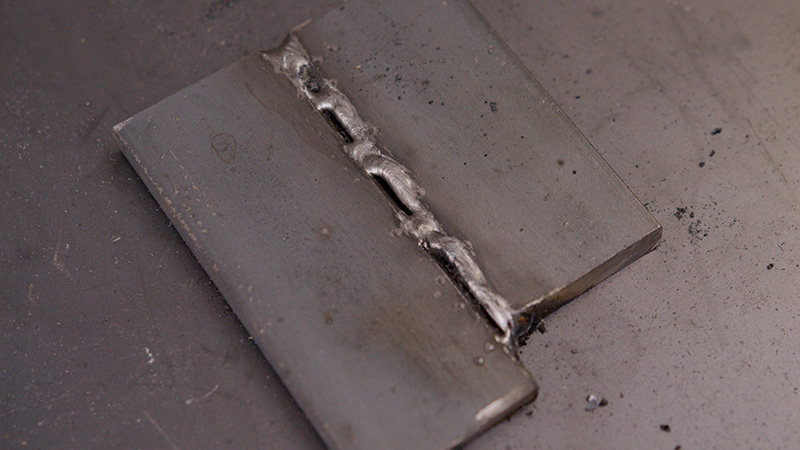
10. Spatter
What is it and what does it look like?
Spatter is the small balls of metal that surround a weld once you’re done. While welding, the sparks that spray from the torch or electrode often include little bits of molten metal, and these are left around the weld once they’ve hardened. They don’t actually cause any harm to the weld, but it certainly adds to your clean up time after you’re done with the weld. Stick and MIG welding are the main welding processes that will produce spatter, and a lot of the time, it’s impossible to not create it. There are a few ways that you can minimise how much spatter you do make.
What causes it?
- The amps are too high
- The volts are too low, or the wire speed is too high (MIG)
- The arc length is too long
- Your work angle (torch position in relation to joint) is too steep
How can you prevent or fix it?
- Move your torch or electrode closer to the joint to shorten the arc length (a good length is 3mm)
- Readjust your amps/volts
- Prep your metal and clean any dirt, paint, or otherwise from the surface
- Use an anti-spatter spray so you can just chip it off once you’re done, rather than coming back with a grinder
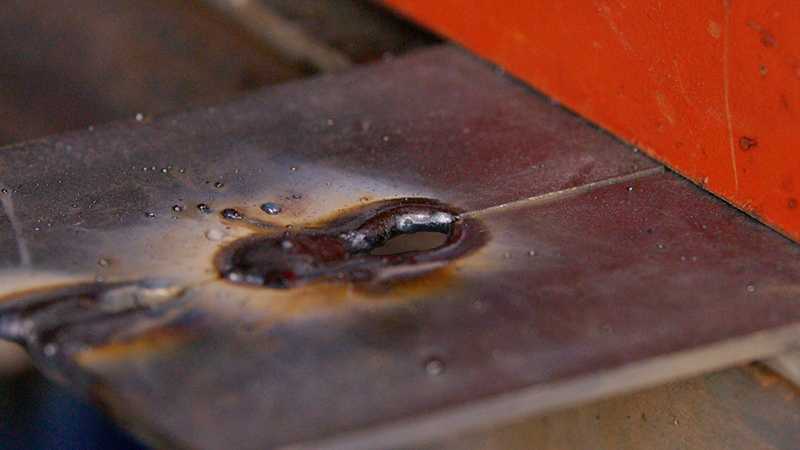
11. Craters
What is it and what does it look like?
A weld crater is a dip or hole at the end of a weld that hasn’t been fully filled. Weld craters can happen on any kind of weld. They can often lead to cracking, so filling the end of your welds is important.
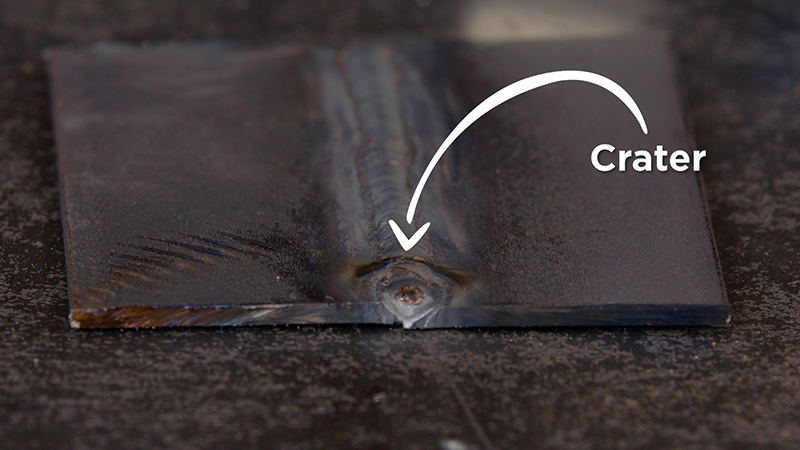
What causes it?
- Not enough filler metal deposited at the end of the weld
How can you prevent or fix it?
- Pause for a few extra moments (or dab extra filler for TIG), and let the weld bead build up slightly
- Ease off the amps slowly to narrow the weld pool as you come out of the weld
- Once you reach the end of the weld, ‘back step’ to fill in the end
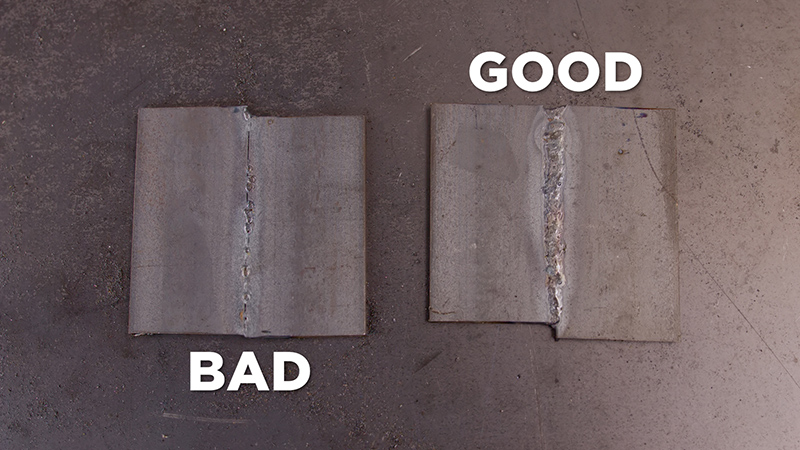
12. Convex and Concave Weld Beads
What is it and what does it look like?
A convex or concave weld bead is generally a sign that something is not quite right with your weld. If the correct settings and technique have been used, the weld should lay flat (mitre) against the parent metal.

What causes it?
- A convex (or ropey) bead is caused by
- Not having enough heat to properly flatten the weld at the same time as,
- Travelling too fast
- A concave bead is caused by
- Too much heat
- Travelling too slow
How can you prevent or fix it?
- Adjust your settings and travel speed to suit your parent metal (UNIMIG machines all come with a settings guide)
- Make sure you’re using the proper welding technique: push for gas and pull for gasless
Almost every issue you encounter when welding can be prevented with proper preparation. It can seem like a lot of work and hassle, but doing it in the first place will be a lot faster than having to remove a dodgy weld and start again (and then still need to be prepped!).
If you start with dirty metal and a poorly calibrated machine, you’re not going to get the greatest weld. Be patient, and if something goes wrong, we can help identify and solve the problem so you can be back up and running in no time.